Thursday 26 May 2011

Lighting

Due to also being involved in another UCA engagment with fashion Atelier I was not able to make Wednesday 25th May and get involved with the lighting of the film set however I came in the next morning for group 1's lesson on the lighting.

HEALTH AND SAFTEY:


  • Use gloves when moving the barn doors for both spot and flood lights to avoid burning your hands as they get very hot.

  • As some of the lights have 3 tiers and as they become very tall, they are the top head and can fall over easily. To avoid this sandbads are placed over the legs at the bottom to keep them stable.

  • Lights must be placed the right way round on the stands and all wires must never be placed in front of or cover the radiator at the back of the light.

  • Be aware of any cables on the floor.

NOTES ON LIGHTING:


  • The Lighting can help create illusions, shadows can distort the set and fool the audience.

  • To make certain Stills or films work is all in how we control the light. What is it that we want to be controlling?

  • Through the use of different lights we are able to contorl: The colour, direction, intensity, harsh and soft lighting, the mood and certain compositions.

  • The differentce between harsh and soft lighting: HARSH: Harsh and sharp shadows are created, the light is pretty solid. SOFT: The light is often bounced off a board to create a more subtle highlight and produce a more defused look.

VIDEO: We can control:


  • Aperture- How wide of small the lense is made, the smaller the aperture the less light is allowed through the lense.

  • Changes in Depth of Field - The focus for example: The person in front of the camera in focus whilst the background is blurred and visa-versa.

  • Composition

STILLS: We can control:


  • Shutter speed- How quick the picture is taken, with a slow shutter speed there is often a slight blur.

  • Aperture- Exposure to light

  • ISO- sensitivity to light

GELS: We can control:


  • Gels are put infront of the light to change the colour, the light shines through the gel.

  • The gel is clipped onto the barn doors in font of the light. The barn doors must be pushed slightly forward for then to be clipped.

  • The gels can be layered to create different colours.

  • Colour correction

  • Sets the mood

SCRIMS:


  • Put in front of the light and place between the light and the barn doors. The barn doors must be off to allow the scrim to be put into place.

  • Stops down the light- As people get closer to the light the brighter they become.

  • Scrims can make the light apear softer.

  • Scome scrims are cut in half to create different efftects.

I found this mornings lesson very informative and look forward to being able to take part in lighting next time.

Work done in the study

Once the panneling had been placed on the walls in the study they now needed to be painted however after the first panel was painted we noticed that where the nails had be drilled into the wood could be easily seen.

Going around the room Abbie and I used filler to cover over the nails. Once dried we then used sand paper and sanded them down to make them smooth so when the painted went over them the nails could no longer be seen, this also gave the panels some nice texture in areas.


Once dried we then carried on painting the panneling using the same wood graining technique used on previous peices, using a base coat then adding another slightly darker colour over the top to then lightly add black with a dry brush to finish.

Helping with Heather and Laurens Table

Whilst Lauren was absent from class I help Heather sand their small table.

Before started the feet which had previously been made and put on the table had to be removed. As the feet were made from paper mache and then painted over in the gold paint, they were proving very difficult to remove. I resulted in having to cut the feet off using a knife and small hand saw.


Once the feet were off the table legs they were then ready to sand. Using a hand held electric sander I sanded down the legs to remove any excess dried glue and to make them smooth. I found the sander very efficient and easy to use.


I done the same for both sets of legs. Heather then went on to rounding off the corners and continuing with the rest of the table.

Painting the Dado Rails

For sections of the doors and the planks of wood which the doors were later going to be hinged onto, a number of thin Dado Rails needed to be painted so they could then be attatched as soon as possible.

With an undercoat of a red/brown mixture of paint I then painted over the dado rails with gold paint. The paint was used sparingly and lightly so that parts of the undercoat could show through to produce a more toned appearance.


The paint brushes were then washed in Methylated Spirit due to the gold being oil based paint and would not be removed from the brushes with water.

This job was simple and was able to be done fast and came out very effective.

Fixing The Broken Baroque Picture Frame


For one of the Baroque frames which was broken, Abbie and I worked together to fit it so it could then be used as a photo frame for the set. The frame had been broken in half with opposite corners snapped. The backing of the frame (the card which would have held the photo in place) was missing. Whilst I held the frame together Abbie took measurements which she then went and cut the back out from ply wood. As Abbie was away cutting the back out I was left with the broken frame, where both corners had become disjointed bent nails were visable and sticking out of the frame.


Using pliers and from some of the other nails a hammer I removed all the evident nails. From pulling the first nail out I noticed that the nails had gone rusty so in doing so when removing them I was very aware and carefull not scratch or cut myself with the rusty nails.


JOINING THE FRAME TOGETHER:

Before putting the corners together using a hand held electric sander, I sanded down each side of where it had broken as there was dried hot glue stuck onto the wood where someone had previously tried to stick the frame together.


To join the corners of the frame together we put "No More Nails" adhesive and pressed the corners together until the connection was strong enough that we no longer had to hold them together before adding a second form of support. On the corners which were now previously broken we added a small peice of ply wood and nailed them into the frame to keep the corners from coming apart again.


The frame was now ready for a photograph to be printed and inserted into the frame, however once finished and was up on the wall the frame was not able to sit 100% straight and whilst most of the members of the group thought it was not extremely noticeable a number of students strongly disagreed and the frame was removed from the set.

Helping to paint the bookcase draws

To help Dan, Chloe and Nuria, Abbie and I painted the draws which were to be placed on the bookcase. I painted the draws with a base coat of a ligh brown whilst Abbie also done the same and added the wood graining effect by adding a darker brown on top to then add black paint using a dry brush.
Eventhough we only took part in painting the draws I feel the overall end result of the bookcase was come together well and looks very effective in the sets alcove.

Helping With Fiona's Tiles

Like many people in the group I helped with some of tiles for Fiona's Russian fireplace.


The tiles had been painted in Covent Garden Primer and two coats of White emulsion paint, when dry I drew around fionas acetate stencils of the petals which were placed in each corner of the tile then around a seperate stencil which included all the circular decoration which was then put is in the centre of each tile. Once drawn I then traced one of three designs: A cat, rabbit, harpie while fiona done the picture of the flowers by eye.


This job was simple, stencilling was easier than painting as painted took more time, patience and had to be done correctly however I was happy to help fiona and the rest of the group who were also helping to finish off the tiles.

Putting Flats Together

Due to sickness I wasn't able take part in any of putting the flats together to create the basic shape of the set.

From the beginning- Making and Painting The Flats

BEFORE MAKING THE FLATS:


In the room which our set would be built in we wanted to be able to see how much space our it would take up, measuring it out and then using masking tape we taped along the floor to create the outline of the set. This was the outline which both rooms would fit into.

This allowed the group to get the realisation and overall insight into the true size the set would become. From doing this some changes were made such as the drawing room becoming larger, the study becoming smaller and for the study to become rectangular instead of square.

The group also went through a health and saftey workshop before the flats were allowed to be made. We were reminded of the general health and saftey such as the need for eye protection goggles, face masks, sensible clothing and steel capped boots. The group then also got to experience pre-drilling holes into the timber, using the chop saw, how to mitre corners correctly, taught how to use a Square correctly and what the router is used for and how to use it.


MAKING THE FLATS:

The majority of flats are made at the basic size of 8ft x 4ft as it is the most common size for the ply skins to come in. Ply Skins are the sheets of Ply which are placed ontop of the timber frames.


Before we began to make the flats we had to take into consideration how many flats were needed and if any had to be made smaller that 8ft x 4ft. For the windows, doors, walls by the doors and the archive that was situated in the study the flats had to be changed. Henry helped the group to work out the correct measurements and which flats would make it easier if changed for when it came to putting the flats together later one.

By drawing out the floor plan of the rooms once more i then split the walls into the correct amount of flats. This was for my own peace of mind, to avoid confusion and helped me to understand where the changes to an individual flats were needed. Through drawing this out also allowed me to look back as a reminder is needs be during the making of the flats.

MAKING THE FRAMES:

Each majority of the flats were made up of the timber frames were made up of 7 individual peices of timber. With 5 peices of timber being the same size, the the 3 in the centre and the two and the top and bottom of the frame which lay horizontally whilst the two longer peices of timber on each side vertically. With the flats having to be 4ft wide, the width of the vertically peices of timber had to be deducted from the peices which would lay horizontally so when put together the frame would not be to big for the ply skins.

With the timber cut down to size we predrilled 5 holes up each of the longer peices of timber, each with a 2ft gap inbetween. Drilling the top and bottom of the frame to the sides and then the three centre peices before attatching the longer peice of timber on the other side.


ADDING THE PLY SKINS:

Once the frames were complete on one side of the frame we applyed a coat of PVA glue and then put the sheet of ply on top. Making sure one end of the flat was completely flush, with members of the group holding down the ply as flat as possible using a nail gun we nailed the ply skin to the timber frame. Using a metre ruler we drew lines every 2ft and nailed across the lines to ensure the three peices of timber which were braced within the flat were also being secured to the ply skin to complete the flat.


Pictures: Making sure ply is flush and nailing the ply skin.


Making the flats was relatively simple however very repetitive and time consuming which was not helped with the unwanted trouble of the nail gun repeatedly breaking throughout the making.


PAINTING THE FLATS:

Once all flats were made we began to paint doing the wood grain effect but only coming up 3ft up from the bottom of each flat. This was for what the panneling would later be placed on top of. We wanted a the flat to be mahogany, using Red Oxide as the base coat but whilst still wet we added the colour Burnt Umber to then go over in the top with a dry brush using a small amount of Black paint.

Health and Saftey throughout the making of the table

Removing the Table Top from the Legs:


  • Steel capped boots were worn- protect my feet incase any peices were dropped.

  • Protective eye goggles- protect my eyes when shortening the table legs.

  • Face mask - Avoid breathing in saw dust from sawing to shorten the table legs.
During Sanding:


  • Goggles- were worn to throughout prevent saw dust getting into my eyes.

  • Face mask- worn during heavy sanding to prevent breathing in the excess dust.

Using the gold paint:


  • Made sure to keep in a well ventilated area due to fumes given off from the paint.

Tuesday 24 May 2011

Previous Table Research

Looking At The Feet


Detailed or decorated feet were nearly always used for the foot of the table, many manipulating an animal foot or birds claws.


The Centre Pole: This type of detail is also used within my own table however mine with gold details.


Even though originally most Baroque style tables were higher, the table I made had to be made shorter for it to fit and look in proportion to the "Love Seat" which my coffee table will be situated in front of.

Finishing the Table

Now that both parts of the table were finished it could now be put together once again.


I began by turning the table onto its top so that the underneath was facing upwards and placed the legs back into where they had originally joined together, this could be seen as the holes on the table top were still visible and where the legs had been removed the wood was lighter than the rest of the table. This made it easier for me to make sure that the table legs were sitting perfectly staright. Using a drill I then screwed them back together.


THE TABLE NOW COMPLETE

checking for errors

After the feet were attatched I went over the table to check that all the golden areas were covered properly, for the small areas which had been missed I went over with a thin brush. Like all the brushes I used when painting with the gold paint, as the paint is oil based I used Methylated Spirit to clean the brushes.

Saturday 21 May 2011

Preparing the Feet

As the feet of the table had been obviously neglected they were incredibly dirty and the true colour underneath could not be seen. After rubbing down with a cloth I found only some of the colour was beginning to shine through, speeding up the process I moved on from the cloth and chose to rub down the rest of the foot using iron wool. This brought out the true colour and shine which had been hidden beneath the build up of grime and dirt.


Each foot took around 45minutes to fully clean and once finished I used small golden screws and screwed them back onto the foot of the table.

Adding the Gold

Before moving onto using the gold paint I went back over any areas if they were slightly uneven or missing.


Once the varnish had fully dried I wanted to add a gold paint over certain sections for the table to achieve a more Baroque appearance. When I wanted to add the gold paint, using masking tape I taped around the edges so when painted they would be sharp and to not allow the paint to bleed or drip onto unwanted areas.


As the paint was quite thick it did not spread as easily as I had hoped this meant painting took a little longer than first expected.

On the legs which lead down to the feet of the table I originally wanted to paint down the four small engraved lines however after putting masking tape on the leg and began to paint I found the paint was too thick even when using a small paint brush. As it made the table look messy and unprofessional I made the decision to not paint down the lines but to change it to painting down the centre of the legs.

Original Idea....


After being Changed....

The gold did not come out as bright as I hoped however as it was the same paint which the rest of the group had been using all the furniture will still fit together.

Wednesday 18 May 2011

Varnishing

Now that the table was fully sanded it was then ready for it to be repainted and varnished. I removed the old masking tape which covered the sides of the centre of the table and retaped it with new thicker masking tape to ensure no varnish would seep through, damage or stain any part of the the centre table.

I began with the table top, using a mahogany colour based varnish I made sure I was using a sensible amount of varnish, avoiding putting to much on the brush to keep from getting uneven areas or drip marks. I painted along the grain of the whole wooden areas of the table-top then left to dry. The varnish was then fully touch dry within the hour where I then added a second coat to create a slightly darker colour.


Whilst left to dry I moved onto painting the table legs ( still without the feet on). Varnishing to the table legs took longer as where the different sections had been put together during making the grain lines where in different directions. I took more time on the centre pole especially on the rounded detail as I was careful to avoid getting thicker areas of varnish in the creases. Like the table-top once dry I added a second layer.

Sanding the legs

Once the table-top was fully sanded I moved onto sanding the legs. Like the table top I used a chisel on the four legs down to where the feet had been removed. Using the sharpened corners of the chisel to get the varninsh and dirt out of the four lines which are down each leg.

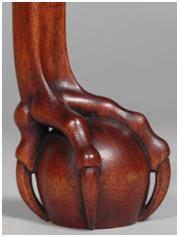
However the chisel was limited in its use when it came to the centre pole which is between the two ends of the table. For it being round the chisel did not remove enough varnish in one go so I found just using sandpaper in this case was the quicker option. For the rounded, extra decorated areas I folded the sandpaper which allowed it to get into the deeper creases in the wood.


The pole was the most time consuming part of the table as the chisel could not be used, it took a much more time to get varnish and grime out of the deep rounded areas and as the pole was rounded I found myself having to move the table into different positions to get into the creases properly.

Sunday 15 May 2011

Starting the Table

As the table had to be made lower I decided to take out the nails which held the table-top to the legs together and detached the top of the table. As the table was now in two seperate parts this also made the table easier to sand down later on.

MAKING THE LEGS SHORTER

I marked down where I wanted the legs to be cut down to and using a square i drawn a line across, this was to make sure that when i cut the wood it would defianty be in a straight line. Turning the table into a vertical possition, holding onto the table legs I used a panel saw to cut the unnesessary wood. I done the same for both sides.


STARTING TO SAND DOWN

Once the legs had been cut i began to sand down the table. I firts started that the table top, by using a sharpened chisle I found it made it easier to remove the top layer of old paint, varnish and the built up layers of dirt around the sides and in the edges. I covered the sides of the leather-like material which covers the centre of the table with masking tape so it would not get damaged during the sanding process. For the table top the most challenging and time consuming areas were the sides. (Abbie helped me sand the top of the tabe)


Once the majority of the paint was off I went over the whole top of the table once more but using sandpaper to smooth over the surface and remove any paint or dirt which was still lodged in the harder to reach areas.